Полевой Техник: различия между версиями
Nemesis (обсуждение | вклад) Нет описания правки |
SHLEPOQQ (обсуждение | вклад) перевод основной |
||
| Строка 13: | Строка 13: | ||
|description = Вы - снаряжены и обучены возводить укрепления, перенаправлять линии электропередач и строить бункеры. Ваш отряд рассчитывает на вас, когда дело дойдет до строительства на поле боя. | |description = Вы - снаряжены и обучены возводить укрепления, перенаправлять линии электропередач и строить бункеры. Ваш отряд рассчитывает на вас, когда дело дойдет до строительства на поле боя. | ||
}} | }} | ||
'' | ''Есть и хорошие новости — мы раздобыли четыре таких пулемётных турели с исправными дисплеями и сканерами , они блин, просто разносят всё в клочья, думаю, они нам пригодятся». | ||
— Капрал Хикс, «Чужие»'' | |||
Как '''Полевой техник''',твои основные задачи '''восстановление электропитания''', '''вскрытие дверей''', и '''создание укреплений для FOB (Полевая оперативная база)''' которые будут использоваться для обороны и обеспечения линии снабжения. Без вас ваше подразделение останется без энергии и FOB, что критически важно для успеха миссии. | |||
Вам будут доступны два стиля игры, которые можно опробовать. Первый, стиль '''Инженер строитель''', который возводит укрепления FOB и обеспечивает работу систем энергоснабжения. Второй стиль — '''Боевой инженер''', который проделывает проходы в стенах, взламывает двери, заваривает вентиляционные шахты и чинит повреждённые ЛКП и освещение по мере продвижения морской пехоты. Оба стиля одинаково эффективны, но перекос в сторону одного из них нежелателен. Убедитесь, что FOB можно будет удержать, а если он уже построен — что морпехи смогут беспрепятственно перемещаться от здания к зданию. | |||
<center> | <center> | ||
== [[File:Vendor Equipment Rack.png|64px]] | == [[File:Vendor Equipment Rack.png|64px]] Раздатчик экипировки[[File:Vendor Equipment Rack.png|64px]] == | ||
</center> | </center> | ||
<tabs> | <tabs> | ||
<tab name=" | <tab name="Стандартная экипировка"> | ||
{| style="border: 2px solid black; class="mw-collapsible" | {| style="border: 2px solid black; class="mw-collapsible" | ||
! style="background-color:#A9A9A9; width:150px;"|''' | ! style="background-color:#A9A9A9; width:150px;"|'''Экипировка:''' | ||
! style="background-color:#A9A9A9; width:800px;"|''' | ! style="background-color:#A9A9A9; width:800px;"|'''Описание:''' | ||
|- | |- | ||
|style="border: 2px solid black; padding: 5px;" |[[File:jumpsuit.png|64px]]<br>''' | |style="border: 2px solid black; padding: 5px;" |[[File:jumpsuit.png|64px]]<br>'''Стандартная экипировка морпеха''' | ||
|style="border: 2px solid black; padding: 5px;" | | |style="border: 2px solid black; padding: 5px;" |Стандартная униформа морской пехоты, выдаваемая только боевому персоналу ККМП США. Также существуют варианты этой униформы, предназначенные для другого персонала морской пехоты. | ||
|- | |- | ||
|style="border: 2px solid black; padding: 5px;"| [[File:Boots.png|64px]]<br>''' | |style="border: 2px solid black; padding: 5px;"| [[File:Boots.png|64px]]<br>'''Боевые ботинки морпеха''' | ||
|style="border: 2px solid black; padding: 5px;"| | |style="border: 2px solid black; padding: 5px;"| Стандартные армейские ботинки, используемые ККМП США в боевых условиях. | ||
|- | |- | ||
|style="border: 2px solid black; padding: 5px;"|[[File:M10_technician_helmet.png|64px]]<BR>''' | |style="border: 2px solid black; padding: 5px;"|[[File:M10_technician_helmet.png|64px]]<BR>'''Шлем техника М10''' | ||
|style="border: 2px solid black; padding: 5px;"| {{M10 Technician Helmet}} | |style="border: 2px solid black; padding: 5px;"|{{M10 Technician Helmet}} | ||
|- | |- | ||
|style="border: 2px solid black; padding: 5px;"| [[File:Squad_Gloves.gif|64px]]<br>''' | |style="border: 2px solid black; padding: 5px;"| [[File:Squad_Gloves.gif|64px]]<br>'''Боевые перчатки ККМП США''' | ||
|style="border: 2px solid black; padding: 5px;"| | |style="border: 2px solid black; padding: 5px;"| Стандартные армейские тактические перчатки морпеха с защитой от тока. | ||
|- | |- | ||
|style="border: 2px solid black; padding: 5px;"| [[File:Headset.png|64px]]<br>''' | |style="border: 2px solid black; padding: 5px;"| [[File:Headset.png|64px]]<br>'''Гарнитура ККМП''' | ||
|style="border: 2px solid black; padding: 5px;"| | |style="border: 2px solid black; padding: 5px;"| Стандартная гарнитура ККМП США со встроенным интерфейсом для идентификации ролей морпехов. | ||
|- | |- | ||
|style="border: 2px solid black; padding: 5px;"| [[File:MRE.png|64px]] | |style="border: 2px solid black; padding: 5px;"| [[File:MRE.png|64px]] | ||
''' | '''Стандартный сухпай ККМП ''' | ||
|style="border: 2px solid black; padding: 5px;"| Standard issue USCM brand | |style="border: 2px solid black; padding: 5px;"| Standard issue USCM brand Стандартный сухпай ККМП США — «Готовый к употрeблению» (MRE), собственность Космической Морской Пехоты США. Предназначен для использования в полевых условиях. Срок его годности истекает как минимум через два десятилетия после того, как истекут шансы на ваше выживание. | ||
|} | |} | ||
</tab> | </tab> | ||
<tab name=" | <tab name="Броня"> | ||
{| style="border: 2px solid black; class="mw-collapsible" | {| style="border: 2px solid black; class="mw-collapsible" | ||
! style="background-color:#A9A9A9; width:130px;"|''' | ! style="background-color:#A9A9A9; width:130px;"|'''Броня:''' | ||
! style="background-color:#A9A9A9;"|''' | ! style="background-color:#A9A9A9;"|'''Описание:''' | ||
|- | |- | ||
|style="border: 2px solid black; padding: 5px;" |[[File:M3 light armor.png]] | |style="border: 2px solid black; padding: 5px;" |[[File:M3 light armor.png]] | ||
| Строка 80: | Строка 80: | ||
|} | |} | ||
</tab> | </tab> | ||
<tab name=" | <tab name="Рюкзаки"> | ||
{| style="border: 2px solid black; class="mw-collapsible" | {| style="border: 2px solid black; class="mw-collapsible" | ||
! style="background-color:#A9A9A9; width:130px;"|''' | ! style="background-color:#A9A9A9; width:130px;"|'''Рюкзаки:''' | ||
! style="background-color:#A9A9A9;"|''' | ! style="background-color:#A9A9A9;"|'''Описание:''' | ||
|- | |- | ||
|style="border: 2px solid black; padding: 5px;"|[[File:H5_pattern_M2132_machete_scabbard.png|64px]] | |style="border: 2px solid black; padding: 5px;"|[[File:H5_pattern_M2132_machete_scabbard.png|64px]] | ||
'''H5 | ''' Чехол H5 для мачете M2132 ''' | ||
|style="border: 2px solid black; padding: 5px;"| | |style="border: 2px solid black; padding: 5px;"|Большой кожаный чехол для мачете M2132. Может крепиться на спину или на броню. | ||
|- | |- | ||
|style="border: 2px solid black; padding: 5px;" |[[File:Technician_backpack.png]] | |style="border: 2px solid black; padding: 5px;" |[[File:Technician_backpack.png]] | ||
''' | '''Рюкзак техника''' | ||
|style="border: 2px solid black; padding: 5px;" | | |style="border: 2px solid black; padding: 5px;" |Стандартный армейский рюкзак, выдаваемый техникам ККМП США. | ||
Has to be held in one hand to access items inside. Holds 7 normal size items. | Has to be held in one hand to access items inside. Holds 7 normal size items. | ||
| Строка 100: | Строка 100: | ||
|style="border: 2px solid black; padding: 5px;"| [[File:Technician_satchel.png]] | |style="border: 2px solid black; padding: 5px;"| [[File:Technician_satchel.png]] | ||
''' | '''Сумка техника''' | ||
|style="border: 2px solid black; padding: 5px;"| | |style="border: 2px solid black; padding: 5px;"| Тяжёлый разгрузочный жилет, используемый некоторыми техниками ККМП США. | ||
Является стандартной экипировкой для большей части личного состава ККМП США. Вмещает 5 предметов стандартного размера. | |||
|- | |- | ||
|style="border: 2px solid black; padding: 5px;"| [[File:L44_M37A2_scabbard.png]] | |style="border: 2px solid black; padding: 5px;"| [[File:L44_M37A2_scabbard.png]] | ||
'''L44 M37A2 | '''Чехол L44 для дробовика M37A2''' | ||
|style="border: 2px solid black; padding: 5px;"| | |style="border: 2px solid black; padding: 5px;"| Большая кожаная кобура, предназначенная для хранения и переноски дробовика M37A2. Оснащена системой креплений, позволяющей зафиксировать его на спине для быстрого доступа. | ||
|- | |- | ||
|style="border: 2px solid black; padding: 5px;"|[[File:Welderpack.png|64px]] | |style="border: 2px solid black; padding: 5px;"|[[File:Welderpack.png|64px]] | ||
''' | '''Рюкзак сварщика''' | ||
|style="border: 2px solid black; padding: 5px;"|{{USCM Technician Welderpack}} | |style="border: 2px solid black; padding: 5px;"|{{USCM Technician Welderpack}} | ||
| Строка 119: | Строка 119: | ||
|style="border: 2px solid black; padding: 5px;"|[[File:Weldersatchel.png|64px]] | |style="border: 2px solid black; padding: 5px;"|[[File:Weldersatchel.png|64px]] | ||
''' | '''Сумка сварщика''' | ||
|style="border: 2px solid black; padding: 5px;"|{{USCM Technician Welder-Satchel}} | |style="border: 2px solid black; padding: 5px;"|{{USCM Technician Welder-Satchel}} | ||
|} | |} | ||
</tab> | </tab> | ||
<tab name=" | <tab name="Пояс"> | ||
{| style="border: 2px solid black; class="mw-collapsible" | {| style="border: 2px solid black; class="mw-collapsible" | ||
! style="background-color:#A9A9A9; width:150px;"|''' | ! style="background-color:#A9A9A9; width:150px;"|'''Пояс:''' | ||
! style="background-color:#A9A9A9; width:800px;"|''' | ! style="background-color:#A9A9A9; width:800px;"|'''Описание:''' | ||
|- | |- | ||
{{G8-A General Utility Pouch}} | {{G8-A General Utility Pouch}} | ||
|- | |- | ||
{{M276 pattern ammo load rig}} | {{M276 pattern ammo load rig}} | ||
|- | |- | ||
|style="border: 2px solid black; padding: 5px;"| [[File:M276_pattern_M4A3_holster_rig.png|64px]]<br>'''M276 | |style="border: 2px solid black; padding: 5px;"| [[File:M276_pattern_M4A3_holster_rig.png|64px]]<br>'''Пояс M276 с кобурой для пистолета ''' | ||
|style="border: 2px solid black; padding: 5px;"| | |style="border: 2px solid black; padding: 5px;"|Модель M276 является стандартным поясом ККМП США. Оно состоит из модульного ремня с различными карабинами. Данная версия имеет кобуру, которая позволяет надёжно и удобно носить пистолеты M4A3, 88M4 или M1911. Также она включает боковые подсумки для магазинов калибра 9 мм или .45. | ||
Это один из нечасто встречающихся поясов в торговых автоматах ККМП. Он также является стандартным снаряжением для '''специалистов по снабжению, офицеров разведки, пилотов, штабных офицеров и [[Executive Officer]]'''. | |||
|- | |- | ||
|style="border: 2px solid black; padding: 5px;"| [[File:M276_pattern_M39_holster_rig.png|64px]]<br>'''M276 | |style="border: 2px solid black; padding: 5px;"| [[File:M276_pattern_M39_holster_rig.png|64px]]<br>'''Пояс M276 с креплением для M39''' | ||
|style="border: 2px solid black; padding: 5px;"| | |style="border: 2px solid black; padding: 5px;"| Модель M276 является стандартным поясом снаряжения ККМП США. Она состоит из модульного ремня с различными карабинами. Данная версия разработана для пистолета-пулемёта M39 и отличается усиленным каркасом для надёжного крепления оружия. | ||
|- | |- | ||
|style="border: 2px solid black; padding: 5px;"| [[File:M276_pattern_M44_holster_rig.png|64px]]<br>'''M276 | |style="border: 2px solid black; padding: 5px;"| [[File:M276_pattern_M44_holster_rig.png|64px]]<br>'''Пояс M276 с кобурой для револьвера''' | ||
|style="border: 2px solid black; padding: 5px;"| | |style="border: 2px solid black; padding: 5px;"| Модель M276 является стандартным поясом снаряжения ККМП США. Она состоит из модульного ремня с различными карабинами. Данная версия предназначена для револьвера M44 «Magnum» и снабжена тремя подсумками для быстросъёмных обойм. От снаряжения faintly smells of hay. | ||
|- | |- | ||
|style="border: 2px solid black; padding: 5px;"| [[File:M276_pattern_M82F flare gun holster rig.png|64px]]<br>'''M276 | |style="border: 2px solid black; padding: 5px;"| [[File:M276_pattern_M82F flare gun holster rig.png|64px]]<br>'''Пояс M276 с кобурой для M82F''' | ||
|style="border: 2px solid black; padding: 5px;"| | |style="border: 2px solid black; padding: 5px;"| Модель M276 является стандартным поясом снаряжения ККМП США. Она состоит из модульного ремня с различными карабинами. Данная версия предназначена для сигнального пистолета M82F. | ||
|- | |- | ||
|style="border: 2px solid black; padding: 5px;"| [[File:Shotgun_belt.png|64px]]<br>''' | |style="border: 2px solid black; padding: 5px;"| [[File:Shotgun_belt.png|64px]]<br>'''Пояс M276 с патронташем для дробовика''' | ||
|style="border: 2px solid black; padding: 5px;"| | |style="border: 2px solid black; padding: 5px;"| Патронный пояс, предназначенный для размещения ружейных патронов или отдельных пуль. Вмещает 10 горстей патронов. | ||
|- | |- | ||
|style="border: 2px solid black; padding: 5px;"| [[File:M276_pattern_mortar_operator_belt.png|64px]]<br>'''M276 pattern mortar operator belt''' | |style="border: 2px solid black; padding: 5px;"| [[File:M276_pattern_mortar_operator_belt.png|64px]]<br>'''M276 pattern mortar operator belt''' | ||
| Строка 726: | Строка 727: | ||
---- | ---- | ||
== | ==Снаряжение и Экипировка== | ||
=== | ===Металл и Мешки с песком=== | ||
В начале раунда в вашем основном наборе техника находится 30 листов пластали и 50 листов металла. Пласталь — это дорогой, но чрезвычайно прочный материал в вашем распоряжении. Дополнительные запасы можно приобрести в вашем снаряженческом вендоре или, когда начнутся поставки через ASRS, вы сможете получить больше. Не накапливайте большое количество строительных материалов, иначе другие боевые техники могут оказаться не в состоянии выполнять свои задачи, и если вас захватят в плен или вы погибнете с большим количеством припасов, они, скорее всего, будут безвозвратно утеряны в этом раунде. | |||
== | ==Соединение складных баррикад из пластали [[File:Plasteel Barricade.gif]] == | ||
Вы можете соединить складные баррикады из пластали с помощью лома. Это можно использовать для создания прохода, чтобы через них могло пройти больше морпехов. Для этого необходимо, чтобы как минимум две складные пласталевые баррикады были обращены в одном направлении и находились в одинаковом состоянии (открыты/закрыты). Иногда баррикады могут быть перемещены, и человек, делающий это, может прикрутить их гаечным ключом, но забыть закрыть защитную крышку с помощью отвёртки. Если вы когда-нибудь воспользуетесь ломом на пласталевой баррикаде и не получите сообщение о том, что баррикада готова к соединению, проверьте её с помощью отвёртки (или используйте Shift+ЛКМ для осмотра). | |||
== | ==В полевых условиях== | ||
=== | === Энергия и Вышка телекоммуникации === | ||
При первой высадке вам, скорее всего, поставят задачу либо...[[Guide_to_Engineering#Power_Duty|починка энергии]], [[Guide_to_Engineering#Static_Telecommunications|починка вышки телекоммуникации]],оставаться на FOB. | |||
<br> | <br> | ||
=== | === Преодоление препятствий === | ||
* [[File:Crowbar.png|32px]] | * [[File:Crowbar.png|32px]] Используйте лом чтобы открыть дверь на которую не подается энергия | ||
* [[Guide_to_Engineering#Hacking| | * [[Guide_to_Engineering#Hacking|Взломайте]] двери, чтобы открыть ранее заблокированные проходы. Если дверь не запитанa, но заперта на болты (на двери горят жёлтые индикаторы), вам придется восстановить подачу питания на дверь, прежде чем она откроется. | ||
* [[File:C4.png|32px]] C4 | * [[File:C4.png|32px]] Можно использовать заряд C4 на двери/стене если у вас нет времени на взлом/разбор | ||
* | * Разборка окон ([[File:screwdriver.png|32px]]->[[File:crowbar.png|32px]]->[[File:screwdriver.png|32px]]) и оконной рамы ([[File:Wrench.png|32px]]) | ||
<br> | <br> | ||
=== | === Освещение места === | ||
* [[Guide_to_Engineering#APC_Maintenance| | * [[Guide_to_Engineering#APC_Maintenance|Починка АПЦ]] и замена сломанных ламп с помощью заменщика ламп ([[File:Lightreplacer.png|32px]]) | ||
* | *Починка освещения — это один из самых эффективных инструментов в арсенале боевого техника. Без света любой, кто перемещается между линией фронта и зоной высадки, вынужден пробираться через тёмные коридоры, и чаще всего это делают медики с раненым товарищем. | ||
<br> | <br> | ||
==== | ==== Ремонт прожекторов ==== | ||
Хотя вы, возможно, и восстановили энергоснабжение колонии (и включили выключатель прожекторов колонии [[File:Colony_Floodlight_Switch.gif|32px]]), ксеносы, скорее всего, повредили прожектора вокруг, которые вам предстоит починить. Для ремонта прожектора выполните следующие действия: | |||
[[File:Broken_Floodlight.png|48px]] = [[File:Screwdriver.png|48px|link=|Screwdriver]] -> [[File:Crowbar.png|48px|link=|Crowbar]] -> [[File:Welder.gif|48px|link=|Welder]] -> [[File:CableCoils.png|48px|link=|Cable Coil]] -> [[File:Screwdriver.png|48px|link=|Screwdriver]] | [[File:Broken_Floodlight.png|48px]] = [[File:Screwdriver.png|48px|link=|Screwdriver]] -> [[File:Crowbar.png|48px|link=|Crowbar]] -> [[File:Welder.gif|48px|link=|Welder]] -> [[File:CableCoils.png|48px|link=|Cable Coil]] -> [[File:Screwdriver.png|48px|link=|Screwdriver]] | ||
* | * Аварийные прожектора можно открутить и переместить. | ||
<br> | <br> | ||
=== [[File:SentryGun.png|64px]] | === [[File:SentryGun.png|64px]] Развертывание обронительных сооружений [[File:Tesla-Coil.png|64px]] === | ||
Когда вы прибываете на поле боя, вам потребуется установить ваше оборонительное сооружение, чтобы прикрыть фланги или поддержать морпехов в бою. | |||
Просто возьмите конструкцию в руку и нажмите по ней, пока она находится в активной руке. Убедитесь, что клетка перед вами свободна. После установки не забудьте снова нажать на сооружение, чтобы включить его. Вы можете легко поднять его с помощью Security Access Tuner [[File:Multitool.png|32px]] если оно не повреждено. Если сооружение получило урон, просто воспользуйтесь сварочным аппаратом для починки. Вы также можете открутить его гаечным ключом [[File:Wrench.png|32px]], чтобы перемещать не поднимая обратно в инвентарь. | |||
==== [[File:SentryLaptop.png|64px]] | ==== [[File:SentryLaptop.png|64px]] Использование портативного ноутбука турели ==== | ||
После развёртывания турели вы можете установить портативный компьютер управления — он доступен в Снабжении или в вашей подготовительной комнате. Чтобы подключить его к турели, используйте ваш Security Access Tuner [[File:Multitool.png|32px]] на ноутбуке, затем нажмите Security Access Tuner на турель чтобы подключить ее. К одному ноутбуку можно подключить сразу несколько турелей | |||
После развёртывания и подключения вы можете изменить настройки системы «свой-чужой» турели, чтобы определить, по кому она НЕ будет стрелять. Доступные варианты: не стрелять по персоналу ККМП США и «Вейланд-Ютани», только по персоналу ККМП США или по всем гуманоидам. Также вы можете использовать её как камеру с таким же радиусом обзора, как у человека. | |||
=== | === Используйте торговые автоматы === | ||
* [[File:Wrench.png|32px]] | * [[File:Wrench.png|32px]] Используйте гаечный ключ например на медицинском вендоре после перетащите на FOB и взломайте при помощи Security Access Tuner [[File:Multitool.png|32px]] для того чтобы медики и морпехи получили доступ к ним. | ||
== | == На передовой == | ||
Именно здесь боевой техник проявляет себя наилучшим образом и от его действий напрямую зависит, смогут ли морпехи закрепиться на позиции или будут отброшены после первоначального натиска. | |||
Существует три основных типа баррикадных линий на передовой, но есть и универсальные принципы, применимые ко всем: | |||
* Разворачивайте баррикады внутрь — это увеличивает пространство для ведения огня и создает более крупную зону поражения. | |||
* | * Направляйте противника в узкие места/коридоры — это позволяет меньшему числу врагов атаковать одновременно (к тому же, они будут мешать друг другу при отступлении). | ||
* | * Держите дистанцию от баррикад до ближайших углов/укрытий противника — это заставляет его дольше оставаться под огнём как при атаке, так и при отходе. | ||
* | * Стройте баррикады с расчётом на то, что морпехи будут стоять на одну клетку позади них — это критически важно для их эффективной стрельбы и выживаемости,но помните пули от морпехов ломают баррикады. | ||
* | |||
<br> | <br> | ||
{| style="border: 2px solid black; | {| style="border: 2px solid black; | ||
! style="background-color:orange;"|''' | ! style="background-color:orange;"|'''Схема баррикад:''' | ||
! style="background-color:orange;"|''' | ! style="background-color:orange;"|'''Описание:''' | ||
|- | |- | ||
|style="border: 2px solid black; padding: 5px;" |[[File:Killingzone.png|400px]] | |style="border: 2px solid black; padding: 5px;" |[[File:Killingzone.png|400px]] | ||
|style="border: 2px solid black; padding: 5px;" | | |style="border: 2px solid black; padding: 5px;" |Исходная линия баррикад создаёт узкую точку сдерживания, которая не позволяет морпехам эффективно использовать всю свою огневую мощь на данной позиции. Решение: баррикаду можно было построить: <span style="color:red">'''красной линии'''</span> чтобы больше морпехов могло подавлять противника огнем, или даже дальше <span style="color:DeepSkyBlue">'''синей линии'''</span> чтобы использовать укрытия ксеносов против них самих, создавая двухсекционную зону поражения. Это увеличит время нахождения противника под огнём и позволит обороняющимся морпехам держать безопасную дистанцию. | ||
<br> | <br> | ||
✔ | ✔ Большая зона поражения. | ||
✔ | ✔ Заставляет противника проходить через узкий проход ,подставляясь под огонь морпехов | ||
✔ | ✔ В двух клетках от ближайшей позиции противника, где у него есть укрытие. (Это означает, что для атаки им придётся подставиться под огонь) | ||
✔ | ✔ Морпехи стоят на 1 клетку позади баррикад чтобы их нельзя было атаковать ,но они все равно могли удерживать баррикаду | ||
|- | |- | ||
|style="border: 2px solid black; padding: 5px;" |[[File:Inward3.png|400px]] | |style="border: 2px solid black; padding: 5px;" |[[File:Inward3.png|400px]] | ||
|style="border: 2px solid black; padding: 5px;" |<span style="color:darkred">''' | |style="border: 2px solid black; padding: 5px;" |<span style="color:darkred">'''Это пример не правильного строительства баррикад'''</span> | ||
Если баррикады вынесены наружу, это помещает обороняющихся морпехов непосредственно в точку сдерживания, ставя их в невыгодное положение во время боя. | |||
|- | |- | ||
|style="border: 2px solid black; padding: 5px;" |[[File:Inward4.png|400px]] | |style="border: 2px solid black; padding: 5px;" |[[File:Inward4.png|400px]] | ||
|style="border: 2px solid black; padding: 5px;" |<span style="color:darkgreen">''' | |style="border: 2px solid black; padding: 5px;" |<span style="color:darkgreen">'''Это пример того как правильно построены баррикады'''</span> | ||
Расширяя баррикады внутрь,используется узкое пространство ,затрудняя атаки ксеносов. | |||
|} | |} | ||
<br> | <br> | ||
=== | === Передовая база/форпост === | ||
Защищённое пространство непосредственно за линией фронта, где морпехи могут пополнять запасы, оказывать первую помощь и эвакуировать раненых. Без такой передовой базы медики и раненые будут постоянно подвергаться нападению, а припасы будут уничтожены. В случае контратаки морпехам некуда будет отступить, и их, скорее всего, разобьют. Передовая база не должна быть большой (достаточно пространства 6x6 клеток, больше — при высокой численности игроков). В противном случае её участки останутся без защиты и будут быстро уничтожены. | |||
<br><br> | <br><br> | ||
=== | === Укрепленная баррикадная линия === | ||
Стройте в узком месте, применяйте принципы — и вы получите надёжную оборонительную позицию.Чтобы усилить баррикадную линию, устанавливайте новые баррикады на одну клетку впереди существующей линии, а не позади неё. | |||
<br><br> | <br><br> | ||
=== | === Незащищенные баррикады === | ||
Чаще всего это применяется, когда нужно построить укреплённую баррикадную линию, но пласталь закончилась, и приходится оставлять промежутки. | |||
Хотя такие участки и не полностью защищены, они всё же полезны для: | |||
Сдерживания контратак.Блокировки газовых атак Бойлеров и таранных атак Крушителя.Чтобы не мешать наступлению морпехов, стройте такие баррикады по центру коридора (например, на 2 средних клетках из 4), а боковые секции устанавливайте на одну клетку дальше. | |||
<br><br> | <br><br> | ||
=== | === Баррикады во время атаки морпехов === | ||
Мешки с песком идеально подходят для этой задачи, так как их могут устанавливать морпехи, а время строительства невелико. Металлические баррикады (с колючей проволокой) тоже подходят, однако вместо того, чтобы строить их прямо на передовой под огнём, безопаснее собрать баррикаду чуть позади и затем переместить её на нужную позицию (смотреть [[Combat_Technician#Fortifications_of_the_Trade|this table]] с инструкцией как передвигать баррикады). | |||
<br><br> | <br><br> | ||
=== | === Ремонт роботизированных конечностей === | ||
Выберете поврежденную конечность во время оказания помощи | |||
* [[File:Welder.gif|32px]] | * [[File:Welder.gif|32px]] Сварка лечит весь брут урон (урон от физических атак) | ||
* [[File:CableCoils.png|32px]] | * [[File:CableCoils.png|32px]] Моток проводов лечит берн урон (урон от огня) | ||
<br> | <br> | ||
== FOB | == Обязанности на FOB== | ||
Являясь боевым техником ,вы будете обустраивать опорный пункт (FOB) который станет для морпехов последним рубежом обороны. Чтобы создать эффективную оборону полевой базы вам потребуется: тактически разместить противопехотные мины, установить ручной пулемёт или стационарную турель, развернуть различные оборонительные сооружения. От качества полевой базы напрямую зависит исход раунда: | |||
Плохая база ведёт к поражению, тогда как хорошо укреплённая позиция позволяет отбить атаку, перегруппироваться и перейти в решающее контрнаступление. | |||
<br><br> | <br><br> | ||
На странице [[Guide to construction|строительства]] есть всё необходимое для создания полевой базы — от деревянных баррикад до пласталевых. Там также приведены многие другие полезные объекты, которые боевой техник может возвести вокруг полевой базы или в других местах. | |||
<br><br> | <br><br> | ||
=== | === Принципы === | ||
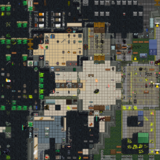
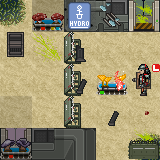
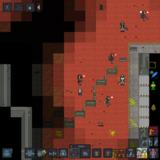
[[File:CargoCadeBypassed.png|160px|thumb|link=http://cm-ss13.com/wiki/images/6/62/CargoCadeBypassed.png|Ghost and see where isn't vital after FOB has fallen]][[File:LVLZbreached.png|160px|thumb|link=http://cm-ss13.com/wiki/images/3/3a/LVLZbreached.png|''One breach is all it takes'']] | [[File:CargoCadeBypassed.png|160px|thumb|link=http://cm-ss13.com/wiki/images/6/62/CargoCadeBypassed.png|Ghost and see where isn't vital after FOB has fallen]][[File:LVLZbreached.png|160px|thumb|link=http://cm-ss13.com/wiki/images/3/3a/LVLZbreached.png|''One breach is all it takes'']] | ||
| Строка 843: | Строка 841: | ||
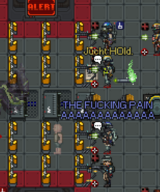
[[File:cade pain.png|160px|thumb|''Too close together, boilers will hit them all at once'']] | [[File:cade pain.png|160px|thumb|''Too close together, boilers will hit them all at once'']] | ||
==== | ==== Вам не всегда нужна мега-полевая база ==== | ||
LZ/FOB | LZ/FOB большую часть раунда будут лишь периодически атаковать до начала осады, поскольку полевая база является сложной целью. Поэтому ксеносы-бэклайнеры, скорее всего, сосредоточатся на незащищённых участках. Сосредоточение усилий исключительно на полевой базе означает использование большого количества материалов для противодействия небольшой группе противника, при этом игнорируя угрозу для более уязвимых зон.Вместо этого необходимо укреплять фланги [[Combat_Technician#Securing_flanks.2Fsupply_route|зашита флангов и маршрутов снабжения]]. | ||
==== | ==== Баррикады которые противник не сможет обойти ==== | ||
Пока ксеносы пытаются обойти вас с флангов, ваша задача — создать им для этого максимум проблем.Если вы строите баррикады в ненужных местах (где нет морпехов), то вы помогаете ксеносам, поскольку на действительно критичных участках останется меньше материалов для обороны. | |||
==== | ==== Важен самый слабый участок ==== | ||
Не имеет значения, что в Нексусе три слоя баррикад, если на LZ стоит один слой металлических баррикад, и он будет прорван — раненые будут убиты, а припасы уничтожены.Что ещё хуже, ксеносы могут вообще проигнорировать Нексус и сконцентрироваться на LZ. Тогда все укрепления в Нексусе окажутся бесполезными. | |||
==== | ==== Используйте материалы рационально ==== | ||
[[Requisitions#Engineering| | [[Requisitions#Engineering|Пласталь стоит дорого]], $4,000 за 30 листов (3 двери) против $2,000 за 50 металла (8 баррикад с колючей проволокой). Однако именно пласталь определяет, сколько защищённых зон вы сможете создать. Если пласталь закончится, вам придётся оставлять проёмы в баррикадной линии, сводя на нет эффективность всей обороны. | ||
Коридор с активным движением? Пласталевая баррикада с колючей проволокой. | |||
* [[File:Welder.gif|32px]] | Нет движения, но высокая угроза (например, таран Крушителя/постоянные атаки)? Баррикады из мешков с песком с колючей проволокой. | ||
* [[File:Wrench.png|32px]] | Нет движения и нужно не пускать Бегунов? Металлические баррикады с колючей проволокой. | ||
* | Экономьте материалы с помощью: | ||
* [[File:Welder.gif|32px]] Используйте сварку на вентиляционных шахтах и дверях . ([[File:Goggles.png]] Опустите щиток в шлеме до начала работы.) | |||
* [[File:Wrench.png|32px]] Перемещения торговых автоматов/шкафов/гидролотков в качестве баррикад (гидролотки '''не блокируют''' Бегунов). | |||
* Установки баррикад позади них, если зона высокорискованная и у вас есть запасы. | |||
==== | ==== Располагать баррикады близко к друг другу плохая идея ==== | ||
Бойлеры могут залить газом баррикады в зоне 5x5 или 3x3 клетки. Размещение баррикад ближе чем в 3 клетках друг от друга позволяет поразить несколько целей одним выстрелом.Идеальная схема обороны требует трёхсекционного построения: пустая клетка для стрельбы из пулемётов, клетка для защитников (морпехи/турели) — вне зоны ближней атаки, тыловая линия для манёвра и эвакуации. Такое построение также обеспечивает безопасный отход с баррикадной линии при атаке бойлера. | |||
---- | ---- | ||
===FOB | ===Подсказки для строительства полевой базы (FOB)=== | ||
==== | ====Размещение баррикад==== | ||
{| style="border: 2px solid black; | {| style="border: 2px solid black; | ||
! style="background-color:orange;"| | ! style="background-color:orange;"|Размещение баррикад | ||
! style="background-color:orange;"| | ! style="background-color:orange;"|Описание | ||
|- | |- | ||
|style="border: 2px solid black;|[[File:WIKIFOB.png|thumb|left]] | |style="border: 2px solid black;|[[File:WIKIFOB.png|thumb|left]] | ||
|style="border: 2px solid black;| | |style="border: 2px solid black;| | ||
<span style="color:darkred">''' | <span style="color:darkred">'''Это пример того как не стоит строить оборонительную позицию.'''</span> | ||
На изображении слева видно, что ксеносы могут атаковать баррикаду из-за угла, не попадая под обстрел, из-за её выдвинутой позиции. Это позволяет противнику легко прорвать оборону и убить морпеха. | |||
|- | |- | ||
|style="border: 2px solid black;|[[File:WIKIFOB2.png|thumb|right]] | |style="border: 2px solid black;|[[File:WIKIFOB2.png|thumb|right]] | ||
|style="border: 2px solid black;| | |style="border: 2px solid black;| | ||
<span style="color:darkgreen">''' | <span style="color:darkgreen">'''Это пример как стоит строить оборонительную позицию.'''</span> | ||
Чтобы исправить указанные ошибки размещения баррикад, отодвиньте их на одну клетку назад, как показано на левом изображении. Это позволит морпехам вести огонь по ксеносам, атакующим укрепления. | |||
|} | |} | ||
<br> | <br> | ||
==== | ==== Колючая проволока ==== | ||
[[File:Barbed_Wire.png|32px]]''' | [[File:Barbed_Wire.png|32px]]'''Колючая проволока - это металлическая лента с острыми шипами, которая наносит урон и не даёт ксеносам перепрыгнуть через баррикады после установки. Она также незначительно увеличивает прочность самой баррикады. | ||
<br> | <br> | ||
{| style="border: 2px solid black; | {| style="border: 2px solid black; | ||
! style="background-color:orange;"| | ! style="background-color:orange;"|Тактика применения колючей проволоки | ||
! style="background-color:orange;"| | ! style="background-color:orange;"|Описание | ||
|- | |- | ||
|style="border: 2px solid black;|[[File:barbedwirenone.png|thumb|left]] | |style="border: 2px solid black;|[[File:barbedwirenone.png|thumb|left]] | ||
|style="border: 2px solid black;| | |style="border: 2px solid black;| На изображении видно, что боевой техник погиб из-за того, что ксенос смог перепрыгнуть через баррикаду. | ||
|- | |- | ||
|style="border: 2px solid black;|[[File:barbedwireyes.png|thumb|left]] | |style="border: 2px solid black;|[[File:barbedwireyes.png|thumb|left]] | ||
|style="border: 2px solid black;| | |style="border: 2px solid black;| | ||
Из-за того что боевой техник установил колючую проволоку на баррикаду ксенонс не смог перепрыгнуть через нее что не привело к смерти боевого техника. | |||
|} | |} | ||
<br> | <br> | ||
====FOB | ==== Место на полевой базе(FOB)==== | ||
{| style="border: 2px solid black; | {| style="border: 2px solid black; | ||
! style="background-color:orange;"| | ! style="background-color:orange;"|Как использовать место на FOB | ||
! style="background-color:orange;"| | ! style="background-color:orange;"|Описание | ||
|- | |- | ||
|style="border: 2px solid black;|[[File:BadFOBspace.png|thumb|left]] | |style="border: 2px solid black;|[[File:BadFOBspace.png|thumb|left]] | ||
|style="border: 2px solid black;| | |style="border: 2px solid black;| | ||
<span style="color:darkred">''' | <span style="color:darkred">'''Это пример того как не стоит строить оборонительную позицию'''</span> | ||
На изображении видно, что конструкция полевой базы оставляет морпехам крайне мало места для манёвра, что приведёт к следующим проблемам: | |||
* | *Дружественный огонь. | ||
* | *Вынужденной постоянной перестановке позиций. | ||
* | *Невозможность эвакуации раненых. | ||
* | *Затруднение получения припасов | ||
|- | |- | ||
|style="border: 2px solid black;|[[File:Goodmovement.png|195px|thumb|left]] | |style="border: 2px solid black;|[[File:Goodmovement.png|195px|thumb|left]] | ||
|style="border: 2px solid black;| | |style="border: 2px solid black;| | ||
<span style="color:darkgreen">''' | <span style="color:darkgreen">'''Это пример того как стоит построить оборонительную позицию'''</span> | ||
На изображении видно,что конструкция полевой базы оставляет морпехам достаточно места что позволяет: | |||
* | *Сократить дружественный огонь | ||
* | *Меньше переставлять позиции | ||
* | *Удобство для медиков в лечении раненных морпехов | ||
* | *Свободное получение припасов | ||
|} | |} | ||
<br> | <br> | ||
==== | ==== Устранение брешей в обороне ==== | ||
{| style="border: 2px solid black; | {| style="border: 2px solid black; | ||
! style="background-color:orange;"| | ! style="background-color:orange;"|Устранение брешей в обороне | ||
! style="background-color:orange;"| | ! style="background-color:orange;"|Описание | ||
|- | |- | ||
|style="border: 2px solid black;|[[File:Bad breaches.png|200px|thumb|left]] | |style="border: 2px solid black;|[[File:Bad breaches.png|200px|thumb|left]] | ||
|style="border: 2px solid black;| | |style="border: 2px solid black;| | ||
<span style="color:darkred">''' | <span style="color:darkred">'''Это пример того, как НЕ следует устранять брешь в линии обороны при наличии рядом противника.'''</span> | ||
На изображении показан крайне опасный и неэффективный способ устранения бреши в линии обороны при наличии рядом противника. Это приведёт к тому, что: | |||
Любой случайно подбежавший ксенос сможет легко атаковать вас в ближнем бою, | |||
У вас будет меньше времени на реакцию при одновременной атаке нескольких ксеносов, | |||
Линия обороны может быть полностью прорвана из-за вашей гибели. | |||
|- | |- | ||
|style="border: 2px solid black;|[[File:FIXINGBREACHES.png|200px|thumb|left]] | |style="border: 2px solid black;|[[File:FIXINGBREACHES.png|200px|thumb|left]] | ||
|style="border: 2px solid black;| | |style="border: 2px solid black;| | ||
<span style="color:green">''' | <span style="color:green">'''Это пример правильных действий при устранении бреши в линии обороны в условиях близости противника.'''</span> | ||
На изображении показан оптимальный способ устранения бреши в вашей обороне,если поблизости находятся ксеносы | |||
<br> | <br> | ||
<br> | <br> | ||
''' | '''Чтобы выполнить этот фиксирующий маневр, вам необходимо:''' | ||
* | *Постройте (или открутите и перенесите) баррикаду на несколько клеток позади, | ||
*[[File:Screwdriver.png|32px]] | *[[File:Screwdriver.png|32px]] Отверткой ослабьте только что построенную баррикаду, | ||
*[[File:Wrench.png|32px]] | *[[File:Wrench.png|32px]] Гаечным ключом закрепите ее для возможности перемещения , | ||
* | *Перетащите баррикаду (Ctrl + ЛКМ или через меню правой кнопки) на клетку перед собой, а затем — на клетку с брешью, как показано на фото. | ||
* | * Снова используйте гаечный ключ и отвертку ,чтобы закрепить баррикаду | ||
<br> | <br> | ||
Это заставит ксеносов пробегать внутрь полевой базы для атаки на вас, что поставит их под угрозу уничтожения, поскольку они окажутся в самой гуще обороны. | |||
Этот метод требует значительно больше времени, чем предыдущий, однако безопасность, которую он обеспечивает, в десять раз ценнее любых улучшений. Если поблизости нет противника, вполне допустимо строить баррикаду обычным способом. | |||
|} | |} | ||
<br> | <br> | ||
==== | ==== Разные советы про полевую базу ==== | ||
{| style="border: 2px solid black; | {| style="border: 2px solid black; | ||
! style="background-color:orange;"| | ! style="background-color:orange;"|Подсказки | ||
! style="background-color:orange;"| | ! style="background-color:orange;"|Описание | ||
|- | |- | ||
|style="border: 2px solid black;|[[File:windows.png|187px|thumb|left]] | |style="border: 2px solid black;|[[File:windows.png|187px|thumb|left]] | ||
|style="border: 2px solid black;| | |style="border: 2px solid black;| | ||
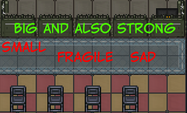
На изображении наглядно показано, что окна, даже укреплённые, не являются полноценной заменой линии баррикад из настоящей стали. | |||
<br> | <br> | ||
''' | '''Окна в качестве обороны:''' | ||
* | *Не обеспечивают огневой рубеж | ||
* | *Слабое | ||
''' | '''Подводя итог избегайте их в качестве защиты''' | ||
|- | |- | ||
|style="border: 2px solid black;|[[File:Frontnotbehind.png|thumb|left]] | |style="border: 2px solid black;|[[File:Frontnotbehind.png|thumb|left]] | ||
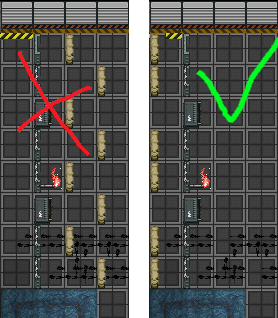
|style="border: 2px solid black;| | |style="border: 2px solid black;|Если у вас есть укреплённая баррикадная линия и вы хотите её усилить — устанавливайте дополнительные баррикады ПЕРЕД основной линией, а не позади, и не блокируйте пласталевые баррикады. | ||
И если у вас есть возможность создать сплошную укреплённую линию — создавайте её. Шахматное расположение баррикад практически не мешает атаке ксеносов. | |||
|- | |- | ||
|style="border: 2px solid black;|[[File:Repairingbarricades.png|thumb|left]] | |style="border: 2px solid black;|[[File:Repairingbarricades.png|thumb|left]] | ||
|style="border: 2px solid black;| | |style="border: 2px solid black;| | ||
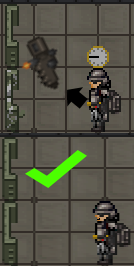
Баррикады неизбежно получают повреждения из-за тягот войны и некомпетентности. Если баррикада не полностью разрушена, вы можете починить её с помощью сварочного аппарата. Это работает для металлических и пласталевых баррикад. | |||
Важно: если баррикада слишком сильно повреждена, вы можете воспользоваться пистолетом с гвоздями который входит в ваш набор техника. | |||
<br> | <br> | ||
<br> | <br> | ||
''' | '''При ремонте баррикады сварка потребляет 1 юнит сварочного топлива''' | ||
|- | |- | ||
|style="border: 2px solid black;|[[File:Alighdoors.png|thumb|left]] | |style="border: 2px solid black;|[[File:Alighdoors.png|thumb|left]] | ||
|style="border: 2px solid black;| | |style="border: 2px solid black;| | ||
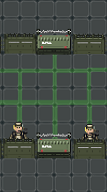
Делайте баррикады так чтобы можно было быстро пройти через них,чтобы не было толкучки среди морпехов | |||
|- | |- | ||
|style="border: 2px solid black;|[[File:Doortoside.png|thumb|left]] | |style="border: 2px solid black;|[[File:Doortoside.png|thumb|left]] | ||
|style="border: 2px solid black;| | |style="border: 2px solid black;| | ||
Установка пласталевой баррикады сбоку снижает вероятность того, что отступающие морпехи заблокируют линию огня обороняющихся. Это также предотвращает ситуацию, когда два морпеха мешают друг другу при одновременном входе/выходе.[[File:Middle_door_traffic_jam.gif|frame]] | |||
|- | |- | ||
|style="border: 2px solid black;|[[File:Maze_barricades_bad.png|thumb|left]] | |style="border: 2px solid black;|[[File:Maze_barricades_bad.png|thumb|left]] | ||
|style="border: 2px solid black;| | |style="border: 2px solid black;| | ||
Лабиринтообразные баррикады бесполезны так как ксеносы не будут идти по коридору - они просто разрушат их,не обращая внимания на схему. | |||
|} | |} | ||
Версия от 13:16, 30 сентября 2025
 |
Сложность: Средняя Руководители: Командир Отряда Звание: Рядовой Первого Класса [0ч] / Младший Капрал [10ч] / Капрал [60ч] Обязанности: Организуйте оборону, нянчитесь с большими пушками, вскрывайте двери и спамьте колючей проволокой. Руководства: Руководство по инженерному делу, Руководство по строительству Условия для получения: Отсутствуют Описание: Вы - снаряжены и обучены возводить укрепления, перенаправлять линии электропередач и строить бункеры. Ваш отряд рассчитывает на вас, когда дело дойдет до строительства на поле боя. |__________| |
Есть и хорошие новости — мы раздобыли четыре таких пулемётных турели с исправными дисплеями и сканерами , они блин, просто разносят всё в клочья, думаю, они нам пригодятся». — Капрал Хикс, «Чужие»
Как Полевой техник,твои основные задачи восстановление электропитания, вскрытие дверей, и создание укреплений для FOB (Полевая оперативная база) которые будут использоваться для обороны и обеспечения линии снабжения. Без вас ваше подразделение останется без энергии и FOB, что критически важно для успеха миссии.
Вам будут доступны два стиля игры, которые можно опробовать. Первый, стиль Инженер строитель, который возводит укрепления FOB и обеспечивает работу систем энергоснабжения. Второй стиль — Боевой инженер, который проделывает проходы в стенах, взламывает двери, заваривает вентиляционные шахты и чинит повреждённые ЛКП и освещение по мере продвижения морской пехоты. Оба стиля одинаково эффективны, но перекос в сторону одного из них нежелателен. Убедитесь, что FOB можно будет удержать, а если он уже построен — что морпехи смогут беспрепятственно перемещаться от здания к зданию.
 Раздатчик экипировки
| Броня: | Описание: | ||
|---|---|---|---|

M3-L Pattern Armor |
Облегчённая версия стандартной брони модели М3. Жертвует защитой ради большей скорости. Эффективнее защищает от кислоты..
| ||

M3 Pattern Marine Armor |
Стандартный бронежилет, используемый ККМП США. Обеспечивает базовую защиту от пуль и атак в ближнем бою.
Также оснащён направленным фонарём на плечевой пластине для ведения боя в тёмное время суток и интерфейсом (HUD) для идентификации коллег по ролям. Универсальная защита, дополненная тремя дополнительными слотами для модулей.
| ||

M3 EOD Pattern Heavy Armor |
Утяжелённая версия стандартной брони модели M3. Броня разработана в первую очередь для противодействия баллистическим, взрывным и внутренним повреждениям. Недостатками являются увеличенная масса, приводящая к снижению скорости передвижения, незначительное повышение защиты от стандартных тупых травм и её полное отсутствие против биологических угроз.
|
| Рюкзаки: | Описание: |
|---|---|

Чехол H5 для мачете M2132 |
Большой кожаный чехол для мачете M2132. Может крепиться на спину или на броню. |

Рюкзак техника |
Стандартный армейский рюкзак, выдаваемый техникам ККМП США.
Has to be held in one hand to access items inside. Holds 7 normal size items. |

Сумка техника |
Тяжёлый разгрузочный жилет, используемый некоторыми техниками ККМП США.
Является стандартной экипировкой для большей части личного состава ККМП США. Вмещает 5 предметов стандартного размера. |

Чехол L44 для дробовика M37A2 |
Большая кожаная кобура, предназначенная для хранения и переноски дробовика M37A2. Оснащена системой креплений, позволяющей зафиксировать его на спине для быстрого доступа. |

Рюкзак сварщика |
Специализированный рюкзак, используемый техниками ККМП США. Оснащён встроенной топливной ёмкостью для быстрой заправки сварочного аппарата и его непосредственного использования.
Для доступа к предметам рюкзак необходимо держать в руках. Вместимость: 7 предметов стандартного размера и 260 единиц топлива для сварочного аппарата. |

Сумка сварщика |
Специализированная сумка, используемая техниками и инженерами ККМП США. Оснащена двумя компактными топливными ёмкостями для быстрой заправки сварочного аппарата и его непосредственного использования.
Вместимость: 4 предмета стандартного размера. Содержит 100 единиц топлива. |
| Пояс: | Описание: |
|---|---|
 G8-A Пояс общего назначения |
Небольшой легкий подсумок, который можно закрепить на броне «Armat Systems» модели M3 для обеспечения дополнительного места для хранения. Более новая модель G8-A, хотя и менее удобная, также может крепиться на пояс. Может вмещать более разнообразные предметы по сравнению со стандартными ремнями. Это один из наиболее редких подсумков в торговом автомате «КолМарТех» in Requisitions. Он вмещает в себя 3 предмета |
 Пояс M276 с кобурой для пистолета |
Модель M276 является стандартным поясом ККМП США. Оно состоит из модульного ремня с различными карабинами. Данная версия имеет кобуру, которая позволяет надёжно и удобно носить пистолеты M4A3, 88M4 или M1911. Также она включает боковые подсумки для магазинов калибра 9 мм или .45.
Это один из нечасто встречающихся поясов в торговых автоматах ККМП. Он также является стандартным снаряжением для специалистов по снабжению, офицеров разведки, пилотов, штабных офицеров и Executive Officer. |
 Пояс M276 с креплением для M39 |
Модель M276 является стандартным поясом снаряжения ККМП США. Она состоит из модульного ремня с различными карабинами. Данная версия разработана для пистолета-пулемёта M39 и отличается усиленным каркасом для надёжного крепления оружия. |
 Пояс M276 с кобурой для револьвера |
Модель M276 является стандартным поясом снаряжения ККМП США. Она состоит из модульного ремня с различными карабинами. Данная версия предназначена для револьвера M44 «Magnum» и снабжена тремя подсумками для быстросъёмных обойм. От снаряжения faintly smells of hay. |
 Пояс M276 с кобурой для M82F |
Модель M276 является стандартным поясом снаряжения ККМП США. Она состоит из модульного ремня с различными карабинами. Данная версия предназначена для сигнального пистолета M82F. |
 Пояс M276 с патронташем для дробовика |
Патронный пояс, предназначенный для размещения ружейных патронов или отдельных пуль. Вмещает 10 горстей патронов. |
 M276 pattern mortar operator belt |
A belt specifically designed to carry ammunition for the M402 mortar along with a sidearm.
Holds 4 mortar shells of any kind and reserves a slot for a pistol. |
 M276 Pattern M40 Grenade Rig |
The M276 is the standard load-bearing equipment of the USCM. It consists of a modular belt with various clips. This version is designed to carry bulk quantities of M40 series of Grenades.
It is the standard rig for Frontline Grenadier Kits. |
 M276 Pattern Toolbelt Rig |
The M276 is the standard load-bearing equipment of the USCM. It consists of a modular belt with various clips. This version lacks any combat functionality and is commonly used by technicians to transport important tools. This contains all the tools for the Combat Technicians and Maintenance Technicians to do their work. |
| Pouch: | Description: | ||||
|---|---|---|---|---|---|
 Construction Pouch |
Designed to holster construction materials. | ||||
 First-Aid Pouch(Refillable Injectors) |
Standard issue field aid for all soldiers. Comes pre-loaded with basic medical supplies. Expended autoinjectors can be restocked at a medical vendor on the Almayer and Dropships (sometimes NanoMed machines are functional planetside.) It is one of the pouch options of the ColMarTech Automated Closet.
It contains the following:
| ||||
 First-Aid Pouch(Splints, Gauze, Ointment) |
Standard issue field aid for all soldiers. Comes pre-loaded with basic medical supplies. Expended autoinjectors can be restocked at a NanoMed  on the Almayer and Dropships (sometimes NanoMed machines are functional planetside.) It is one of the pouch options of the ColMarTech Automated Closet.It contains the following: on the Almayer and Dropships (sometimes NanoMed machines are functional planetside.) It is one of the pouch options of the ColMarTech Automated Closet.It contains the following:
| ||||
 First-Aid Pouch(Pill Packets) |
Standard issue field aid for all soldiers. Comes pre-loaded with basic medical supplies. Comes with two packets of 4 pills. One containing Tricordazine and the other with Tramadol. It is one of the pouch options of the ColMarTech Automated Closet.
It contains the following:
| ||||
 Electronics Pouch (Full) |
Designed to hold all your electronic needs as a technician. Issued to Combat technicians, or found inside the ColMarTech automated armaments vendor in Requisitions.
Contains 6 slots. | ||||
 Explosive Pouch |
Container designed to hold up to three grenades or other explosives | ||||
 Flare Pouch |
Can hold 8 flares (including activated flare). Refillable with a M94 Flare Pack. | ||||
 Large Pistol Magazine Pouch |
Pouch able to hold pistol magazines. | ||||
 Magazine Pouch |
Подсумок ограниченного выпуска, вмещающий три магазина и/или горсти ружейных патронов.
Также является одним из вариантов подсумков в Автоматическом гардеробе ColMarTech и встречается в торговом автомате ColMarTech в снабжении. Содержит 3 слота. | ||||
 Shotgun Shell Pouch |
A shotgun shell pouch. It can contain handfuls of shells, or bullets if you choose to for some reason. Holds 5 slots. | ||||
 Medium General Pouch |
A general purpose pouch used to carry more small items and also magazines. Contains 2 slots. | ||||
 Pistol Pouch |
A holster to carry pistols, typically a standard issue M4A3 handgun, or 88M4 Pistol. | ||||
 Tools Pouch (Full) |
Designed to hold all your different types of tools. |
| Accessories: | Description: |
|---|---|

Shoulder Holster |
A traditional shoulder holster that can be attached to all uniforms. Can holster any handgun and completes the look of any hard-boiled detective. |
 Webbing |
Sturdy mess of synthcotton belts and buckles, ready to share your burden. Holds 3 small sized items or magazines. |
 Brown Webbing Vest |
Worn brownish synthcotton vest with lots of small pockets to unburden your hands. Holds 5 small sized items. |
 Black Webbing Vest |
Robust black synthcotton vest with lots of pockets to hold whatever you need, but cannot hold in hands. Holds 5 small sized items. |
 Drop Pouch |
A convenient pouch to carry loose items around. Able to hold 2 large items. |
| Mask: | Description: |
|---|---|
 Gas Mask |
Противогазы доступны в автоматических гардеробах ColMarTech для всех морпехов. Не обеспечивают никакой защиты для головы. |
 Heat Absorbent Coif |
A close-fitting cap that covers the top, back, and sides of the head. Can also be adjusted to cover the lower part of the face so it keeps the user warm in harsh conditions.
Part of the marine uniform on snow planets. |
 Gear Rack
Перед высадкой вам выдаётся 45 очков, вы можете потратить их в стойке со снаряжением для покупки дополнительных предметов.
|
Снаряжение и Экипировка
Металл и Мешки с песком
В начале раунда в вашем основном наборе техника находится 30 листов пластали и 50 листов металла. Пласталь — это дорогой, но чрезвычайно прочный материал в вашем распоряжении. Дополнительные запасы можно приобрести в вашем снаряженческом вендоре или, когда начнутся поставки через ASRS, вы сможете получить больше. Не накапливайте большое количество строительных материалов, иначе другие боевые техники могут оказаться не в состоянии выполнять свои задачи, и если вас захватят в плен или вы погибнете с большим количеством припасов, они, скорее всего, будут безвозвратно утеряны в этом раунде.
Соединение складных баррикад из пластали 
Вы можете соединить складные баррикады из пластали с помощью лома. Это можно использовать для создания прохода, чтобы через них могло пройти больше морпехов. Для этого необходимо, чтобы как минимум две складные пласталевые баррикады были обращены в одном направлении и находились в одинаковом состоянии (открыты/закрыты). Иногда баррикады могут быть перемещены, и человек, делающий это, может прикрутить их гаечным ключом, но забыть закрыть защитную крышку с помощью отвёртки. Если вы когда-нибудь воспользуетесь ломом на пласталевой баррикаде и не получите сообщение о том, что баррикада готова к соединению, проверьте её с помощью отвёртки (или используйте Shift+ЛКМ для осмотра).
В полевых условиях
Энергия и Вышка телекоммуникации
При первой высадке вам, скорее всего, поставят задачу либо...починка энергии, починка вышки телекоммуникации,оставаться на FOB.
Преодоление препятствий
 Используйте лом чтобы открыть дверь на которую не подается энергия
- Взломайте двери, чтобы открыть ранее заблокированные проходы. Если дверь не запитанa, но заперта на болты (на двери горят жёлтые индикаторы), вам придется восстановить подачу питания на дверь, прежде чем она откроется.
 Можно использовать заряд C4 на двери/стене если у вас нет времени на взлом/разбор
- Разборка окон (
 ->
-> ->
-> ) и оконной рамы (
 )
)
Освещение места
- Починка АПЦ и замена сломанных ламп с помощью заменщика ламп (
 )
) - Починка освещения — это один из самых эффективных инструментов в арсенале боевого техника. Без света любой, кто перемещается между линией фронта и зоной высадки, вынужден пробираться через тёмные коридоры, и чаще всего это делают медики с раненым товарищем.
Ремонт прожекторов
Хотя вы, возможно, и восстановили энергоснабжение колонии (и включили выключатель прожекторов колонии ![]() ), ксеносы, скорее всего, повредили прожектора вокруг, которые вам предстоит починить. Для ремонта прожектора выполните следующие действия:
), ксеносы, скорее всего, повредили прожектора вокруг, которые вам предстоит починить. Для ремонта прожектора выполните следующие действия:
- Аварийные прожектора можно открутить и переместить.
 Развертывание обронительных сооружений
Когда вы прибываете на поле боя, вам потребуется установить ваше оборонительное сооружение, чтобы прикрыть фланги или поддержать морпехов в бою.
Просто возьмите конструкцию в руку и нажмите по ней, пока она находится в активной руке. Убедитесь, что клетка перед вами свободна. После установки не забудьте снова нажать на сооружение, чтобы включить его. Вы можете легко поднять его с помощью Security Access Tuner ![]() если оно не повреждено. Если сооружение получило урон, просто воспользуйтесь сварочным аппаратом для починки. Вы также можете открутить его гаечным ключом
если оно не повреждено. Если сооружение получило урон, просто воспользуйтесь сварочным аппаратом для починки. Вы также можете открутить его гаечным ключом ![]() , чтобы перемещать не поднимая обратно в инвентарь.
, чтобы перемещать не поднимая обратно в инвентарь.
 Использование портативного ноутбука турели
После развёртывания турели вы можете установить портативный компьютер управления — он доступен в Снабжении или в вашей подготовительной комнате. Чтобы подключить его к турели, используйте ваш Security Access Tuner ![]() на ноутбуке, затем нажмите Security Access Tuner на турель чтобы подключить ее. К одному ноутбуку можно подключить сразу несколько турелей
на ноутбуке, затем нажмите Security Access Tuner на турель чтобы подключить ее. К одному ноутбуку можно подключить сразу несколько турелей
После развёртывания и подключения вы можете изменить настройки системы «свой-чужой» турели, чтобы определить, по кому она НЕ будет стрелять. Доступные варианты: не стрелять по персоналу ККМП США и «Вейланд-Ютани», только по персоналу ККМП США или по всем гуманоидам. Также вы можете использовать её как камеру с таким же радиусом обзора, как у человека.
Используйте торговые автоматы
На передовой
Именно здесь боевой техник проявляет себя наилучшим образом и от его действий напрямую зависит, смогут ли морпехи закрепиться на позиции или будут отброшены после первоначального натиска.
Существует три основных типа баррикадных линий на передовой, но есть и универсальные принципы, применимые ко всем:
- Разворачивайте баррикады внутрь — это увеличивает пространство для ведения огня и создает более крупную зону поражения.
- Направляйте противника в узкие места/коридоры — это позволяет меньшему числу врагов атаковать одновременно (к тому же, они будут мешать друг другу при отступлении).
- Держите дистанцию от баррикад до ближайших углов/укрытий противника — это заставляет его дольше оставаться под огнём как при атаке, так и при отходе.
- Стройте баррикады с расчётом на то, что морпехи будут стоять на одну клетку позади них — это критически важно для их эффективной стрельбы и выживаемости,но помните пули от морпехов ломают баррикады.
| Схема баррикад: | Описание: |
|---|---|
|
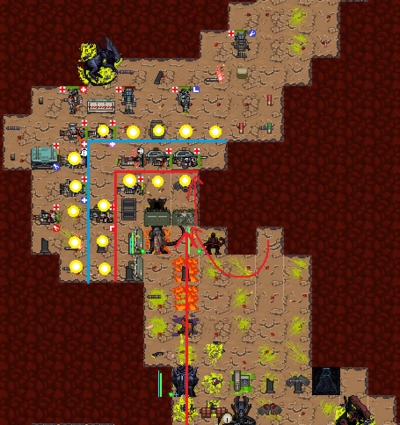
Исходная линия баррикад создаёт узкую точку сдерживания, которая не позволяет морпехам эффективно использовать всю свою огневую мощь на данной позиции. Решение: баррикаду можно было построить: красной линии чтобы больше морпехов могло подавлять противника огнем, или даже дальше синей линии чтобы использовать укрытия ксеносов против них самих, создавая двухсекционную зону поражения. Это увеличит время нахождения противника под огнём и позволит обороняющимся морпехам держать безопасную дистанцию.
✔ Заставляет противника проходить через узкий проход ,подставляясь под огонь морпехов ✔ В двух клетках от ближайшей позиции противника, где у него есть укрытие. (Это означает, что для атаки им придётся подставиться под огонь) ✔ Морпехи стоят на 1 клетку позади баррикад чтобы их нельзя было атаковать ,но они все равно могли удерживать баррикаду |
|
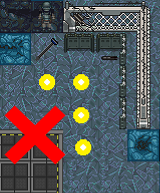
Это пример не правильного строительства баррикад
Если баррикады вынесены наружу, это помещает обороняющихся морпехов непосредственно в точку сдерживания, ставя их в невыгодное положение во время боя. |
|
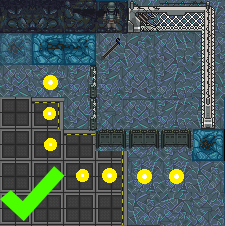
Это пример того как правильно построены баррикады
Расширяя баррикады внутрь,используется узкое пространство ,затрудняя атаки ксеносов. |
Передовая база/форпост
Защищённое пространство непосредственно за линией фронта, где морпехи могут пополнять запасы, оказывать первую помощь и эвакуировать раненых. Без такой передовой базы медики и раненые будут постоянно подвергаться нападению, а припасы будут уничтожены. В случае контратаки морпехам некуда будет отступить, и их, скорее всего, разобьют. Передовая база не должна быть большой (достаточно пространства 6x6 клеток, больше — при высокой численности игроков). В противном случае её участки останутся без защиты и будут быстро уничтожены.
Укрепленная баррикадная линия
Стройте в узком месте, применяйте принципы — и вы получите надёжную оборонительную позицию.Чтобы усилить баррикадную линию, устанавливайте новые баррикады на одну клетку впереди существующей линии, а не позади неё.
Незащищенные баррикады
Чаще всего это применяется, когда нужно построить укреплённую баррикадную линию, но пласталь закончилась, и приходится оставлять промежутки.
Хотя такие участки и не полностью защищены, они всё же полезны для:
Сдерживания контратак.Блокировки газовых атак Бойлеров и таранных атак Крушителя.Чтобы не мешать наступлению морпехов, стройте такие баррикады по центру коридора (например, на 2 средних клетках из 4), а боковые секции устанавливайте на одну клетку дальше.
Баррикады во время атаки морпехов
Мешки с песком идеально подходят для этой задачи, так как их могут устанавливать морпехи, а время строительства невелико. Металлические баррикады (с колючей проволокой) тоже подходят, однако вместо того, чтобы строить их прямо на передовой под огнём, безопаснее собрать баррикаду чуть позади и затем переместить её на нужную позицию (смотреть this table с инструкцией как передвигать баррикады).
Ремонт роботизированных конечностей
Выберете поврежденную конечность во время оказания помощи
Обязанности на FOB
Являясь боевым техником ,вы будете обустраивать опорный пункт (FOB) который станет для морпехов последним рубежом обороны. Чтобы создать эффективную оборону полевой базы вам потребуется: тактически разместить противопехотные мины, установить ручной пулемёт или стационарную турель, развернуть различные оборонительные сооружения. От качества полевой базы напрямую зависит исход раунда:
Плохая база ведёт к поражению, тогда как хорошо укреплённая позиция позволяет отбить атаку, перегруппироваться и перейти в решающее контрнаступление.
На странице строительства есть всё необходимое для создания полевой базы — от деревянных баррикад до пласталевых. Там также приведены многие другие полезные объекты, которые боевой техник может возвести вокруг полевой базы или в других местах.
Принципы
Вам не всегда нужна мега-полевая база
LZ/FOB большую часть раунда будут лишь периодически атаковать до начала осады, поскольку полевая база является сложной целью. Поэтому ксеносы-бэклайнеры, скорее всего, сосредоточатся на незащищённых участках. Сосредоточение усилий исключительно на полевой базе означает использование большого количества материалов для противодействия небольшой группе противника, при этом игнорируя угрозу для более уязвимых зон.Вместо этого необходимо укреплять фланги зашита флангов и маршрутов снабжения.
Баррикады которые противник не сможет обойти
Пока ксеносы пытаются обойти вас с флангов, ваша задача — создать им для этого максимум проблем.Если вы строите баррикады в ненужных местах (где нет морпехов), то вы помогаете ксеносам, поскольку на действительно критичных участках останется меньше материалов для обороны.
Важен самый слабый участок
Не имеет значения, что в Нексусе три слоя баррикад, если на LZ стоит один слой металлических баррикад, и он будет прорван — раненые будут убиты, а припасы уничтожены.Что ещё хуже, ксеносы могут вообще проигнорировать Нексус и сконцентрироваться на LZ. Тогда все укрепления в Нексусе окажутся бесполезными.
Используйте материалы рационально
Пласталь стоит дорого, $4,000 за 30 листов (3 двери) против $2,000 за 50 металла (8 баррикад с колючей проволокой). Однако именно пласталь определяет, сколько защищённых зон вы сможете создать. Если пласталь закончится, вам придётся оставлять проёмы в баррикадной линии, сводя на нет эффективность всей обороны.
Коридор с активным движением? Пласталевая баррикада с колючей проволокой. Нет движения, но высокая угроза (например, таран Крушителя/постоянные атаки)? Баррикады из мешков с песком с колючей проволокой. Нет движения и нужно не пускать Бегунов? Металлические баррикады с колючей проволокой. Экономьте материалы с помощью:
 Используйте сварку на вентиляционных шахтах и дверях . (
 Опустите щиток в шлеме до начала работы.)
 Перемещения торговых автоматов/шкафов/гидролотков в качестве баррикад (гидролотки не блокируют Бегунов).
- Установки баррикад позади них, если зона высокорискованная и у вас есть запасы.
Располагать баррикады близко к друг другу плохая идея
Бойлеры могут залить газом баррикады в зоне 5x5 или 3x3 клетки. Размещение баррикад ближе чем в 3 клетках друг от друга позволяет поразить несколько целей одним выстрелом.Идеальная схема обороны требует трёхсекционного построения: пустая клетка для стрельбы из пулемётов, клетка для защитников (морпехи/турели) — вне зоны ближней атаки, тыловая линия для манёвра и эвакуации. Такое построение также обеспечивает безопасный отход с баррикадной линии при атаке бойлера.
Подсказки для строительства полевой базы (FOB)
Размещение баррикад
| Размещение баррикад | Описание |
|---|---|
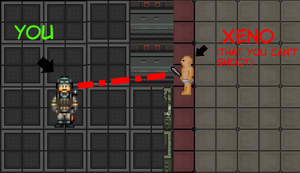 |
Это пример того как не стоит строить оборонительную позицию. На изображении слева видно, что ксеносы могут атаковать баррикаду из-за угла, не попадая под обстрел, из-за её выдвинутой позиции. Это позволяет противнику легко прорвать оборону и убить морпеха. |
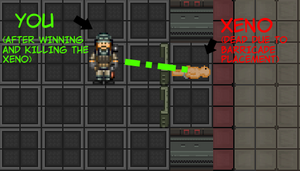 |
Это пример как стоит строить оборонительную позицию. Чтобы исправить указанные ошибки размещения баррикад, отодвиньте их на одну клетку назад, как показано на левом изображении. Это позволит морпехам вести огонь по ксеносам, атакующим укрепления. |
Колючая проволока
![]() Колючая проволока - это металлическая лента с острыми шипами, которая наносит урон и не даёт ксеносам перепрыгнуть через баррикады после установки. Она также незначительно увеличивает прочность самой баррикады.
Колючая проволока - это металлическая лента с острыми шипами, которая наносит урон и не даёт ксеносам перепрыгнуть через баррикады после установки. Она также незначительно увеличивает прочность самой баррикады.
| Тактика применения колючей проволоки | Описание |
|---|---|
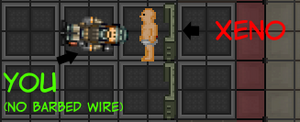 |
На изображении видно, что боевой техник погиб из-за того, что ксенос смог перепрыгнуть через баррикаду. |
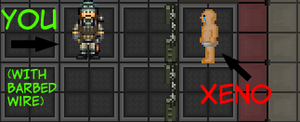 |
Из-за того что боевой техник установил колючую проволоку на баррикаду ксенонс не смог перепрыгнуть через нее что не привело к смерти боевого техника. |
Место на полевой базе(FOB)
| Как использовать место на FOB | Описание |
|---|---|
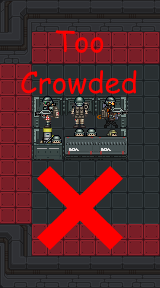 |
Это пример того как не стоит строить оборонительную позицию На изображении видно, что конструкция полевой базы оставляет морпехам крайне мало места для манёвра, что приведёт к следующим проблемам:
|
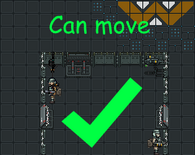 |
Это пример того как стоит построить оборонительную позицию На изображении видно,что конструкция полевой базы оставляет морпехам достаточно места что позволяет:
|
Устранение брешей в обороне
| Устранение брешей в обороне | Описание |
|---|---|
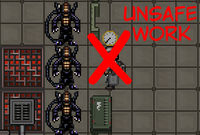 |
Это пример того, как НЕ следует устранять брешь в линии обороны при наличии рядом противника. На изображении показан крайне опасный и неэффективный способ устранения бреши в линии обороны при наличии рядом противника. Это приведёт к тому, что: Любой случайно подбежавший ксенос сможет легко атаковать вас в ближнем бою, У вас будет меньше времени на реакцию при одновременной атаке нескольких ксеносов, Линия обороны может быть полностью прорвана из-за вашей гибели. |
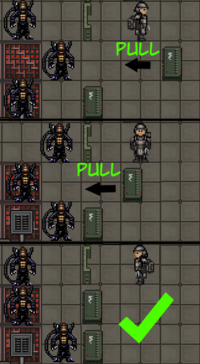 |
Это пример правильных действий при устранении бреши в линии обороны в условиях близости противника. На изображении показан оптимальный способ устранения бреши в вашей обороне,если поблизости находятся ксеносы
|
Разные советы про полевую базу
| Подсказки | Описание |
|---|---|
 |
На изображении наглядно показано, что окна, даже укреплённые, не являются полноценной заменой линии баррикад из настоящей стали.
Подводя итог избегайте их в качестве защиты |
 |
Если у вас есть укреплённая баррикадная линия и вы хотите её усилить — устанавливайте дополнительные баррикады ПЕРЕД основной линией, а не позади, и не блокируйте пласталевые баррикады.
И если у вас есть возможность создать сплошную укреплённую линию — создавайте её. Шахматное расположение баррикад практически не мешает атаке ксеносов. |
 |
Баррикады неизбежно получают повреждения из-за тягот войны и некомпетентности. Если баррикада не полностью разрушена, вы можете починить её с помощью сварочного аппарата. Это работает для металлических и пласталевых баррикад.
Важно: если баррикада слишком сильно повреждена, вы можете воспользоваться пистолетом с гвоздями который входит в ваш набор техника.
|
 |
Делайте баррикады так чтобы можно было быстро пройти через них,чтобы не было толкучки среди морпехов |
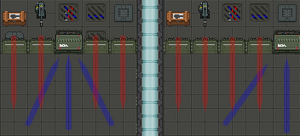 |
Установка пласталевой баррикады сбоку снижает вероятность того, что отступающие морпехи заблокируют линию огня обороняющихся. Это также предотвращает ситуацию, когда два морпеха мешают друг другу при одновременном входе/выходе. |
 |
Лабиринтообразные баррикады бесполезны так как ксеносы не будут идти по коридору - они просто разрушат их,не обращая внимания на схему. |
Fortifications of the Trade
- Main article: Guide to Construction#Defences
| Fortification | Material | Function |
|---|---|---|
 Hand Rail |
2 Metal 
|
A handrail to ward off any intrusions into unwanted areas. Provides very little cover without reinforcing it. To reinforce the handrail, simply add 1 metal sheet to it and weld it.
To remove reinforced plate : |
 Snow Barricade |
3 Snow Piles
|
A very weak barricade constructed from snow piles with a snow shovel. It's better than thin air at least.
Deconstruct: |
 Wood Barricade |
10 Wooden Planks 
|
Used for a hasty defense against aliens. Mostly seen prespawned. Can be repaired with additional wooden planks at any damaged condition.
Deconstruct: Bash the wooden barricade to break it. Give back 3 wooden planks |
 Metal Barricade |
4 Metal
|
The most common among the three main types of barricades (20 points for 50 sheets). Can be repaired with a blowtorch if not overtly damaged.
To unsecure: To upgrade a barricade, click on one with 2 metal sheets, a window will prompt open in which you select the upgrade. |
 Metal Barricade Reinforced |
2 Metal
|
An upgraded version of the metal barricade. This one can take much more damage from bullets and slashes. Can be repaired with a blowtorch if not overtly damaged. |
 Metal Barricade Bio-hazard Resistant |
2 Metal
|
An upgraded version of the metal barricade. This one can take much more damage from acids and fire. Can be repaired with a blowtorch if not overtly damaged. |
 Metal Barricade Explosion Resistant |
2 Metal
|
An upgraded version of the metal barricade. This one can take much more damage from explosive sources with no downside. Can be repaired with a blowtorch if not overtly damaged. |
 Sandbags |
5 Sandbags
|
Dig up dirt with an entrenching tool to fill up the empty sandbags. A fast fortification to field and can built by any marines. You can construct a sandbag barricade with any amount (maximum of 5) from a stack. The more you have in a stack, the stronger it becomes but if you deploy a sandbag with less than the maximum, the weaker the sandbag's maximum health will be. More sandbags can be added to a weaker one until it reaches full strength. Relatively cheap (20 points for 50 empty sandbags). Can be repaired by using filled sandbags.
Deconstruct: |
 Plasteel Barricade |
8 Plasteel
|
Functions as a gate. The most durable fortification with longest build time. The most expensive barricade (40 points for 30 sheets). Can be repaired with a blowtorch if not overtly damaged. |
 Folding Metal Barricade |
6 Metal
|
A folding barricade made out of metal, making it slightly weaker than a normal metal barricade. Use a blowtorch to repair. Can be flipped down to create a path. |
 Barbed Wire |
1 Metal
|
Can be added to barricades prevent them from being pounced and climbed over. Damages mobs that melee attack without a weapon. Deconstruct: |
 Wall |
12 Metal 
|
Used to fully block off an area. See Guide to construction for how to construct and deconstruct. |

Ваши навыки
Чтобы узнать, как работает система навыков, ознакомьтесь с данной страницей.
|
| ||||||||||||||||||||||||||||||||||||||||||||||||||||||
|
| ||||||||||||||||||||||||||||||||||||||||||||||||||||||
|
|
Дополнительные руководства
- Guide To Engineer - От Stan_albatross (01.01.2021)
- On FOB Duty - От RNGPriest (09.04.2021)
- A couple tactically sensible 'cade layout tips - От FreeStylaLT (25.02.2018)


